Connecting to the Databases
The following steps are required to create a connection to any of the MAPS databases. You must perform these steps on the machine where MAPS is installed (or use Remote Desktop to log in to that machine). You should never create or modify database connections from a different computer.
32-bit MAPS installations require the 32-bit SQLite ODBC driver and 32-bit ODBC Data Source Administrator tool, while 64-bit MAPS installations require 64-bit SQLITE ODBC driver and 64-bit ODBC Data Source Administrator tool. To determine whether you are running MAPS 32-bit or 64-bit version, please refer to the MAPS Service 'bit' version listed in the MAPS Diagnostics page.
Driver Installation
We have tested with version .994 available from http://www.ch-werner.de/sqliteodbc.
If the 32-bit version of the ODBC Data Source Administrator is needed it can typically be found at C:\Windows\SysWOW64\odbcad32.exe.
Creating the MAPS Data Warehouse SQLite File
When MAPS is first installed, the MAPSDataWarehouse.sqlite file will be absent from the Service folder (C:\Program Files(x86)\Evisions\MAPS\Service for 32-bit, or C:\Program Files\Evisions\MAPS\Service for 64-bit). To create this file, navigate to the Data Warehouse section of the Auditing & Data Warehouse tab in MAPS Config. Select the Migrate Now button to create the MAPSDataWarehouse.sqlite file.
Creating the Data Source
Next, you need to create a data source. Launch the ODBC Data Source Administrator and go to the System DSN tab.
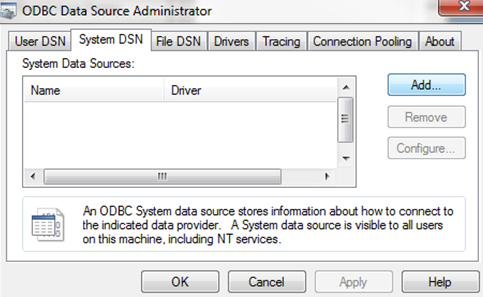
Click the Add button, then select the SQLite3 ODBC Driver.
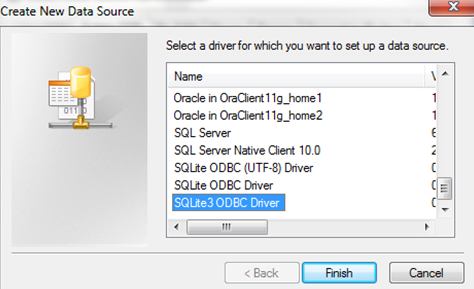
After selecting the driver and clicking Finish, the SQLite3 ODBC DSN Configuration dialog appears. Enter a Data Source Name, click the Browse button, then select the database name (C:\Program Files(x86)\Evisions\MAPS\Service\).
For 32-bit: ( C:\Program Files\Evisions\MAPS\Service\MAPSData.sqlite, C:\Program Files\Evisions\MAPS\Service\MAPSDataWarehouse.sqlite, or C:\Program Files\Evisions\MAPS\Service\Mapplets\Argos\ArgosData.sqlite).
You may enter any name you like for the data source name; however, if you intend to join the MAPS and Argos databases using the technique described in this document, you must enter ArgosSQLite and MAPSSQLite as the data source names for these two databases. This is because the Microsoft JET database we provide expects these data source names. See Joining the Databases for instructions.
You can use any data source name you like if you do not intend to join the live MAPS and Argos databases, or for connecting to the data warehouse database.
Be sure to check the Julian Day Conv. box, otherwise dates will not be displayed.
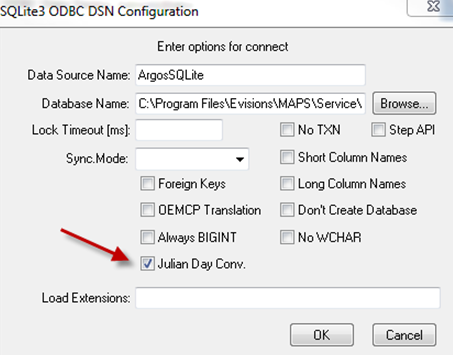
Click OK to complete the configuration.
You can follow the same procedure to create a connection to the MAPS-specific database.
Creating the Connection in MAPS
If you plan to use Argos for reporting, launch the MAPS Config application and create a data connection as follows.
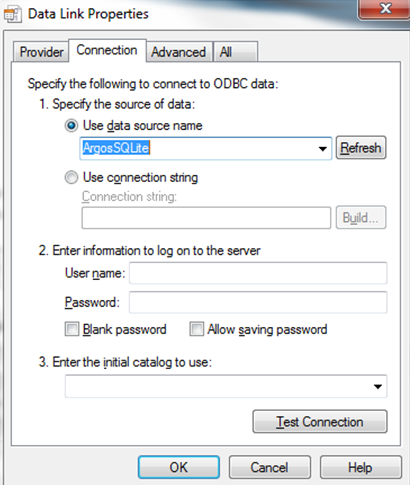
Select Microsoft OLE DB Provider for ODBC Drivers as the database provider.
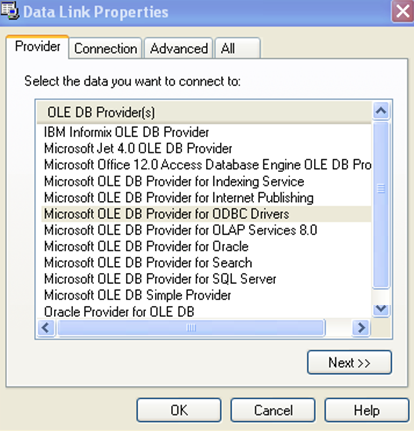
Select the SQLite3 data source that was created in the ODBC Data Source Administrator dialog in the previous step.
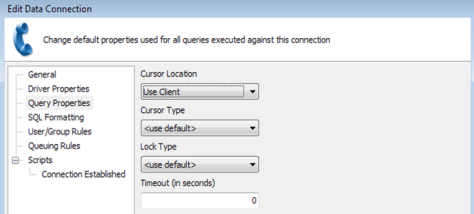
Set the Cursor Location to Use Client. You may not see all data if this is not set appropriately.
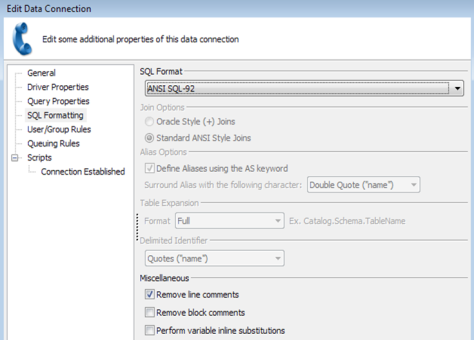
Select ANSI SQL-92 for the SQL Format
Authorizing the Application
If you plan to use Argos to access any of the databases, remember to authorize Argos to use the newly created connection(s).

You should now be able to connect to the database.